Frequently Asked Questions

You must be at least 18 years of age and able to read and write in English. You must be physically able to perform the work of the trade. Finally, you must exercise good self-discipline and be willing to follow through on each and every project you undertake. Check our Services page to learn more about our apprenticeship program requirements.

Cement Masons work on a variety of concrete construction projects, i.e. schools, government facilities, freeways, dams, bridges, entertainment venues, parks and more. Cement Masons build the foundations of our society.

You must be at least 18 years of age and be able to show proof of your age to apply. There is no maximum age to begin training.

Tuition is handled through the apprenticeship sponsors. All you have to do is meet the minimum requirements. You will need to purchase curriculum and the required tools, listed below.

No, but we require you to be able to read and write in English.

If you are age 16 to 24 and haven't completed high school or didn't receive a diploma, there's an alternative: the OPCMIA Job Corps program, a federally-funded opportunity for youths to finish school and begin on the way to learning marketable skills in the construction trades. You can find eligibility rules and details on the program by visiting the Training option at www.opcmia.org.

No, the Cement Masons Apprenticeship is three (3) years of classroom and hands-on instruction. We prepare you for a career that takes commitment and dedication. Cement Masonry is physically demanding, however it is rewarding, personally and professionally.

  • You must wear appropriate clothing to class. Tank tops, shorts, sport shoes and open-toed sandals are prohibited.
  • Necessary classroom materials like pens/pencils, textbooks, etc.
  • A hard hat and safety glasses to each class.
  • All required tools.
  • Your work record books to each class, for review.

Public transportation is available within a reasonable distance from most of our training locations. Construction is a mobile occupation. Reliable personal transportation is necessary. We do not recommend relying on public transportation to get to job site locations.

(3) Three trowels (12x4, 16x4, 18x4), varying in size to fit work)
(1) One pointer (margin trowel)
(1) One set of coving tools (1 nose & 1 cove)
(1) One wood hand float (16 x 3 ½ resin or aluminum)
(1) One rubber float (orange 12 x 4)
(1) One hammer (18 oz)
(1) One sledge hammer (8 lbs)
(1) One hand saw (combination)
(3) Three hand edgers (1/4", 1/2" & 3/4" radius to match coving tools)
(1) One set of knee pads
(1) One set of knee boards
(1) One hand brush (paint brush)
(2) Two levels (1 pocket & 1-24" or longer – 48” preferred)
(1) One pair pliers w/side cutter
(1) One measuring tape (25’)
(1) One roll nylon cord (300’)
(1) One carpenters pencil
(1) One marking crayon
(1) One nail/tool apron


NOTE: These are the minimum tools required as defined in the Master Labor Agreement and must be obtained immediately upon entering the Northern California Cement Masons Apprenticeship Program.


Downloadable Form: Required List of Tools


The Northern California Cement Masons JATC recommends purchasing these tools at the following outlets:

www.Bontool.com
www.Centralconcrete.com
www.Marshalltown.com
www.Mullerconstructionsupply.com
www.Whitecapdirect.com


You will complete 432 classroom hours and 4,200 hours of on-the-job training over the course of three (3) years.

Decorative, Pervious and Polished Concrete are a fast-growing part of the cement industry. With the growing population new homes are needed, so there's a big demand for things like driveways, foundations, concrete walkways and more.

Follow this link and type in your address for directions:

https://goo.gl/maps/ib26ZmCDZRKUD5aM9

Or, call us at 925-484-2271 and ask for directions.

TIPS & TECHNIQUES

When buying cement finishing equipment, it's very important that you use high-quality tools. The work you do is only as good as the tools you're using. See the Tool List above for our recommended vendors.

Tool Tip #1 - Trowel Maintenance

The condition of your tools affects your final product. Day-to-day use of your trowels will wear on their edges, which results in a poor concrete finish. To prevent this, file your trowels' edges regularly.

Here's how to keep your trowels in good shape so your work will be neat and professional:

Trowel maintenance showing a board on the floor with a worker moving the trowel over it

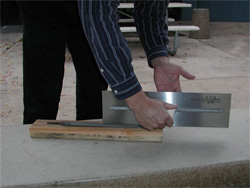
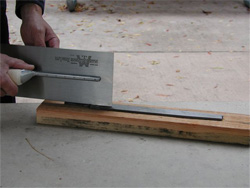
Secure a 10” flat metal file to a flat surface.
In this example, we have used a piece of scrape wood approximately 12" long.

A worker shows how to move the trowel across a board to keep it sharp.

Hold the trowel with both hands.
Run the trowel edge smoothly across the length of the file.

A cement mason shows off his trowel once it has been sharpened

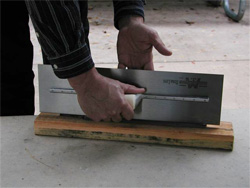
Repeat this process as many times as necessary to create a straight edge. Do the same for the other side.

Tool Tip #2 - Hammers & Sledges

Picking the right hammer is critical to your well being and productivity. As you use your hammer it’s not uncommon for Cement Masons to purchase more than one type of hammer.

Wood handle and Metal handle hammers are shown and each provides different strengths when hammering

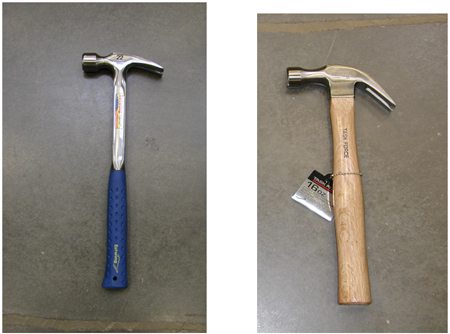
Wood handle or Metal handle hammers?

Most Cement Masons choose metal shank hammers.
These will not break when pulling nails from the forms.

A nail puller, which looks like a crow bar, is shown when needing to pull nails from a tight spot


If you choose a wood shank hammer you must be careful on how hard you pry on things. Too much pressure and you break the handle. Sometimes you will need to use a nail puller “cat’s paw or flat bar” to help pull nails with a wood handled hammer.

Different types of hammers are shown that can pull nails out of wood

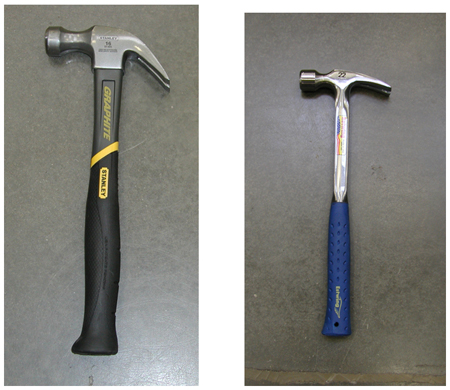
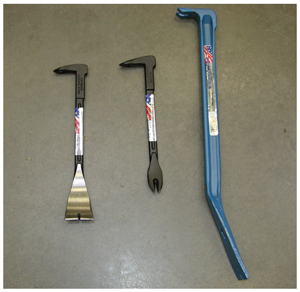
Another consideration is a curved or straight claw hammer.

This is a personal preference. The only drawback to a curved claw, in some areas it’s hard to grab the nail head with the claws due to restricted work space.

Smooth head and waffle head hammers laying on floor

Do you like a smooth head or a waffle head?

A waffle head grabs the nails with less chance of your hammer slipping from the nail head when you hit it. (Keep your fingers out of the way; the waffle head has no mercy on your finger nails.) Choosing a weight of hammer helps you to be more efficient. 16 to 22 ounce hammer is a good medium weight.

Multiple sledge hammers shown on a concrete pad to show the different handle lengths that are available

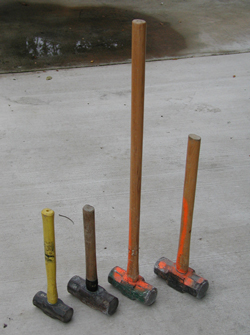
Should I use an 8 pound or a 12 pound sledge?

Apprentices usually start with an 8 pound hammer until they develop the skill and confidence to move to a 10 or 12 pound one. A heavier hammer does more of the work because of its weight.

A construction worker stands next to a sledge hammer to demonstrate the proper handle length

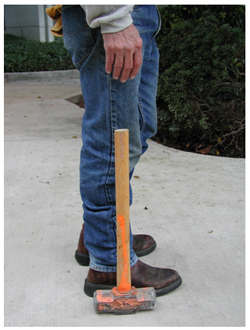
Decide handle length.

A quick easy way to determine the handle length is to stand the hammer next to your leg. Cut the handle at the top of your knee cap. Not too long, not too short.

applications for apprenticeship are Now Open

Scroll to Top